
Importing contacts to Priyo Mail is quick and easy, whether you’re migrating from Gmail, Outlook, or another email service. This guide walks you through every step, ensuring your address book stays organized and up to date without hassle.
Key Takeaways
- Multiple import options: Priyo Mail supports CSV, vCard, and direct sync from popular email platforms.
- Step-by-step process: Follow simple instructions to upload and verify your contact list.
- Data safety first: Your contacts are encrypted and stored securely during and after import.
- Bulk import capability: Add hundreds or thousands of contacts at once without manual entry.
- Format compatibility: Works with files from Gmail, Yahoo, Outlook, and other major providers.
- Error handling tips: Learn how to fix common import issues like missing fields or formatting errors.
- Post-import organization: Use labels and groups to keep your contacts well-organized in Priyo Mail.
📑 Table of Contents
Why Importing Contacts to Priyo Mail Matters
Switching to a new email service like Priyo Mail doesn’t mean starting from scratch. One of the biggest concerns when migrating is losing access to your trusted contacts—your colleagues, friends, family, and business connections. That’s why knowing how to import contacts to Priyo Mail effortlessly is so important. It saves time, reduces frustration, and ensures you stay connected without missing a beat.
Priyo Mail is designed with user convenience in mind. Whether you’re a student managing class group chats, a freelancer coordinating with clients, or a business professional handling a large network, having your contacts readily available makes communication smoother. Instead of manually retyping every email address, you can bring your entire address book over in just a few clicks. This guide will show you exactly how to do it—simply, safely, and efficiently.
Understanding Priyo Mail’s Contact Import Features

Visual guide about How to Import Contacts to Priyo Mail Effortlessly
Image source: 10pcg.com
Priyo Mail offers a robust contact management system that supports multiple import methods. This flexibility means you can bring in your contacts no matter where they’re currently stored. Whether you’re coming from Gmail, Outlook, Yahoo, or even a spreadsheet, Priyo Mail has a solution.
The platform accepts two primary file formats for contact imports: CSV (Comma-Separated Values) and vCard (.vcf). CSV files are ideal for bulk imports and are commonly exported from email services like Gmail. vCard files are more detailed and preserve additional information like photos, job titles, and notes. Priyo Mail also allows direct syncing with some platforms, making the transfer even more seamless.
One of the standout features is the ability to map fields during import. This means if your CSV file has a column labeled “Email Address” and Priyo Mail expects “Email,” the system can automatically align them. This reduces errors and ensures all your data transfers correctly. Plus, Priyo Mail validates email formats during import, flagging any invalid entries so you can fix them before finalizing.
Supported File Formats
Priyo Mail supports the following file types for contact imports:
- CSV: Best for large lists; widely used by Gmail, Outlook, and Excel.
- vCard (.vcf): Ideal for detailed contact info; commonly used by Apple devices and Outlook.
- Direct sync: Available for select platforms like Gmail (via OAuth).
Always ensure your file is saved in UTF-8 encoding to avoid character issues, especially if your contacts include names with accents or special characters.
Preparing Your Contact File
Before you begin the import process, it’s crucial to prepare your contact file properly. A well-structured file leads to a smoother import with fewer errors. Start by opening your source file—whether it’s from Gmail, Outlook, or a spreadsheet—and review the columns.
Make sure essential fields like “First Name,” “Last Name,” and “Email” are present and correctly labeled. Remove any unnecessary columns such as internal IDs or outdated notes. If you’re using a CSV, ensure there are no blank rows or merged cells, as these can confuse the import tool.
For best results, standardize your data. For example, write phone numbers in a consistent format (e.g., +1-555-123-4567) and avoid using special characters in names unless necessary. If you’re importing from Gmail, you can export your contacts directly from the Google Contacts page by selecting “Export” and choosing “Google CSV.” This file is already optimized for import into most email services, including Priyo Mail.
Step-by-Step Guide to Importing Contacts
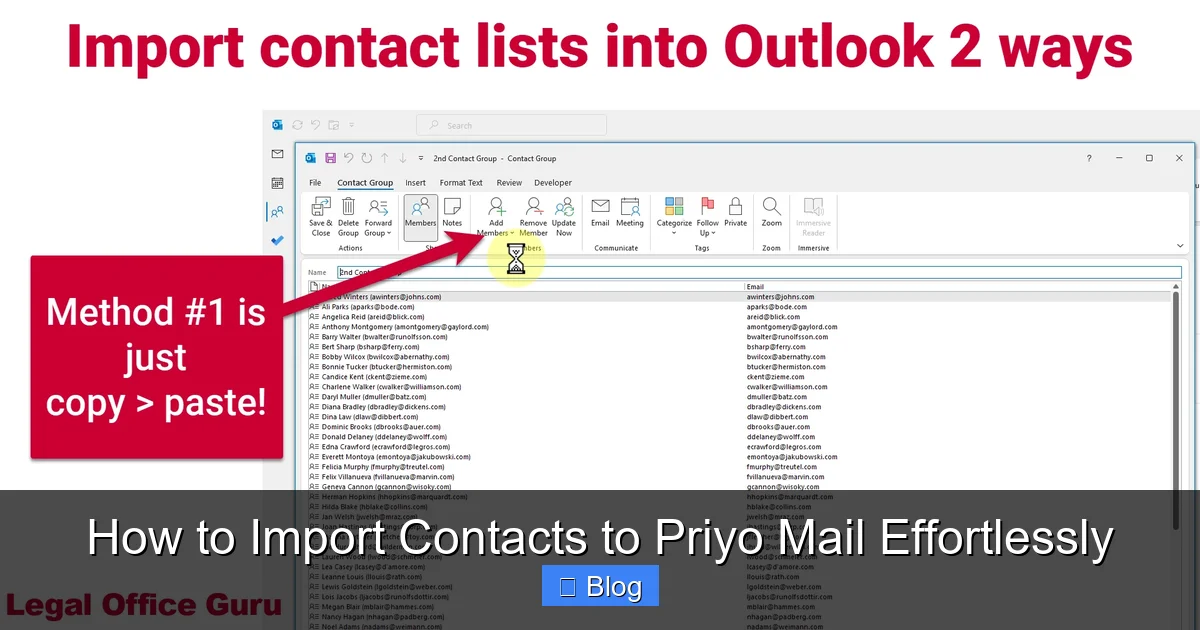
Visual guide about How to Import Contacts to Priyo Mail Effortlessly
Image source: legalofficeguru.com
Now that your file is ready, it’s time to import your contacts into Priyo Mail. The process is straightforward and takes just a few minutes. Follow these steps to ensure a successful import.
Step 1: Log in to Your Priyo Mail Account
Open your web browser and go to the Priyo Mail login page. Enter your email address and password to access your inbox. Once logged in, navigate to the “Contacts” section. This is usually found in the left-hand sidebar or under the “More” menu, depending on your interface version.
Step 2: Access the Import Tool
In the Contacts page, look for an option labeled “Import” or “Add Contacts.” Click on it to open the import wizard. You’ll be presented with a few options: upload a file, sync from another service, or add manually. Select “Upload a file” to proceed.
Step 3: Choose Your File
Click the “Browse” or “Choose File” button to locate your prepared CSV or vCard file on your computer. Select the file and click “Open.” Priyo Mail will begin analyzing the file to detect columns and data types.
Step 4: Map Your Fields
This is a critical step. Priyo Mail will display a preview of your data and ask you to confirm which columns correspond to which contact fields (e.g., email, phone, name). Use the dropdown menus to match your file’s columns to Priyo Mail’s expected fields. For example, if your CSV has a column called “Email Address,” map it to “Email.”
If a field doesn’t match exactly, don’t worry—Priyo Mail often auto-detects common labels. However, always double-check to ensure accuracy. You can also choose to skip certain columns if they’re not needed.
Step 5: Review and Confirm
After mapping, Priyo Mail will show a summary of the contacts to be imported. Review the list to make sure everything looks correct. You’ll also see a count of valid and invalid entries. If there are errors—such as missing email addresses or invalid formats—Priyo Mail will highlight them. You can either fix them in the original file and re-upload or proceed and edit them later.
Once you’re satisfied, click “Import” to begin the process. Depending on the size of your file, this may take a few seconds to a couple of minutes.
Step 6: Verify the Import
After the import completes, go back to your Contacts list and scroll through to confirm your contacts have been added. Check a few entries to ensure names, emails, and other details are correct. If you notice any issues, you can edit individual contacts or re-import a corrected file.
Tips for a Smooth Import Experience
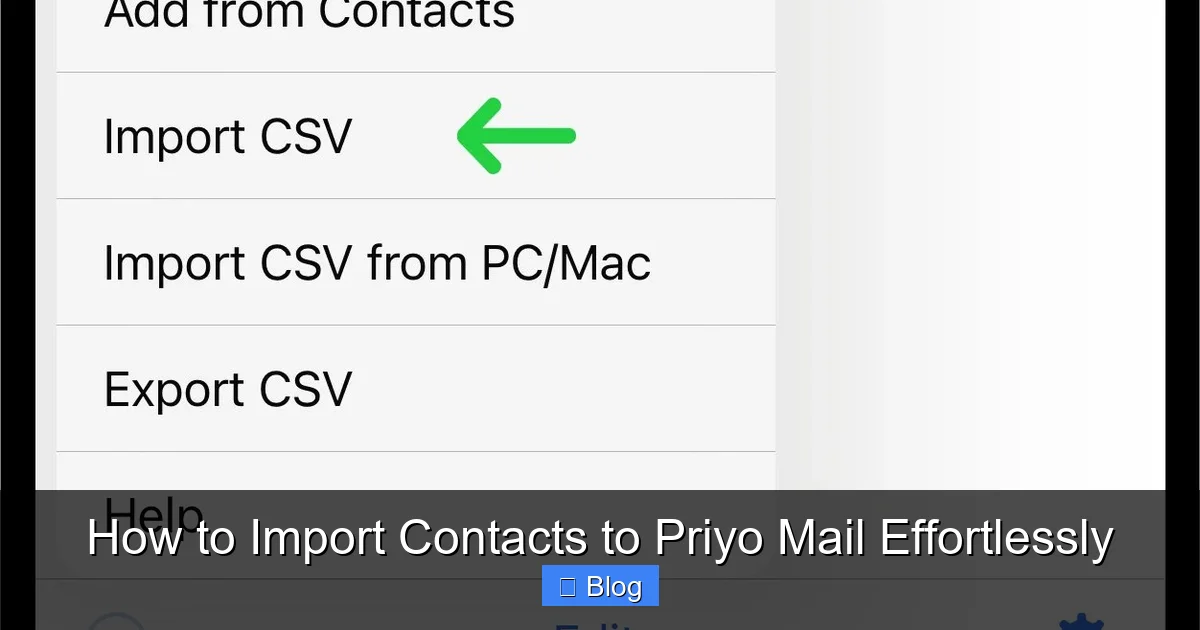
Visual guide about How to Import Contacts to Priyo Mail Effortlessly
Image source: reachtheapp.com
Even with a well-prepared file, small issues can arise during import. Here are some practical tips to help you avoid common pitfalls and ensure a seamless experience.
Clean Your Data First
Before importing, take time to clean your contact list. Remove duplicates, outdated entries, and invalid email addresses. You can use free tools like Google Sheets or Excel to sort and filter your data. For example, use the “Remove Duplicates” feature in Excel to eliminate重复 entries.
Use Consistent Formatting
Inconsistent formatting is a common cause of import errors. Make sure all phone numbers, addresses, and names follow the same style. For instance, decide whether to use “John Smith” or “Smith, John” and stick to it. This helps Priyo Mail process your data more accurately.
Test with a Small Batch
If you’re importing a large number of contacts (say, over 1,000), consider testing with a small batch first. Upload 10–20 contacts to see how the system handles them. This lets you catch any formatting issues early without affecting your entire list.
Backup Your Original File
Always keep a backup of your original contact file before importing. This way, if something goes wrong, you can start over without losing data. Store the backup in a secure location, such as a cloud drive or external hard drive.
Check for Special Characters
Names with accents (like José or François) or symbols can sometimes cause issues if the file isn’t saved in UTF-8 encoding. When exporting or saving your file, choose UTF-8 to preserve these characters correctly.
Troubleshooting Common Import Issues
Despite your best efforts, you might encounter a few hiccups during the import process. Here’s how to handle the most common problems.
“Invalid Email Format” Error
This error occurs when an email address doesn’t follow the standard format (e.g., missing @ symbol or domain). To fix it, open your file and check each email entry. Look for typos like “john.gmail.com” instead of “[email protected].” Correct these and re-upload.
Missing or Misaligned Fields
If Priyo Mail can’t map a column correctly, it may skip that data. Double-check your column headers and ensure they match common labels like “Email,” “First Name,” and “Phone.” Avoid using vague names like “Field1” or “Data.”
File Not Recognized
If Priyo Mail says your file isn’t supported, confirm it’s saved as a CSV or vCard. Also, check that the file isn’t corrupted. Try opening it in a text editor or spreadsheet program to verify the content.
Import Stalls or Fails
Large files can sometimes cause timeouts. If your import fails, try splitting the file into smaller chunks (e.g., 500 contacts per file) and importing them one at a time. This reduces the load and increases success rates.
Organizing Your Contacts After Import
Once your contacts are in Priyo Mail, the work isn’t over—now it’s time to organize them for easy access. A well-structured contact list saves time and improves your email experience.
Create Contact Groups
Use Priyo Mail’s grouping feature to categorize your contacts. Create labels like “Work,” “Family,” “Clients,” or “College Friends.” This makes it easy to send group emails or find specific people quickly.
To create a group, go to the Contacts page, click “New Group,” give it a name, and start adding contacts. You can also assign contacts to multiple groups if needed.
Edit and Update Details
After import, some details might need tweaking. Open individual contact cards to add missing information like job titles, notes, or profile pictures. This enriches your contact database and makes it more useful.
Merge Duplicates
Even after cleaning your file, duplicates might slip through. Priyo Mail has a built-in duplicate detection tool. Go to “Tools” or “Settings” in the Contacts section and run a duplicate check. The system will suggest merges, which you can approve or skip.
Export for Backup
Once everything is set, export your updated contact list as a backup. Go to the import/export section and choose “Export.” Save the file in CSV or vCard format to your device or cloud storage.
Conclusion
Importing contacts to Priyo Mail doesn’t have to be complicated. With the right preparation and a clear understanding of the process, you can transfer your entire address book in minutes. Whether you’re switching from another email service or consolidating contacts from multiple sources, Priyo Mail’s flexible import tools make it easy.
By following this guide—cleaning your data, choosing the right file format, mapping fields correctly, and organizing your contacts afterward—you’ll ensure a smooth and successful import. Plus, with features like bulk uploads, error detection, and secure storage, Priyo Mail proves itself as a reliable choice for managing your digital connections.
So don’t let contact migration hold you back. Take the leap, import your contacts to Priyo Mail effortlessly, and enjoy a more organized, efficient email experience today.
Frequently Asked Questions
Can I import contacts from Gmail to Priyo Mail?
Yes, you can easily import contacts from Gmail to Priyo Mail. Export your Google Contacts as a CSV file, then upload it directly into Priyo Mail’s import tool. The system will guide you through field mapping for a seamless transfer.
What file formats does Priyo Mail support for contact imports?
Priyo Mail supports CSV and vCard (.vcf) file formats. CSV is ideal for large lists, while vCard preserves detailed information like photos and job titles.
How do I fix import errors in Priyo Mail?
Common errors like invalid emails or missing fields can be fixed by reviewing and correcting your source file. Ensure all data is properly formatted and re-upload the corrected version.
Can I import contacts in bulk?
Absolutely. Priyo Mail allows bulk imports of thousands of contacts at once. Just make sure your file is well-structured and free of duplicates for best results.
Is my contact data safe during import?
Yes, Priyo Mail uses encryption and secure servers to protect your data during and after the import process. Your contacts are stored privately and not shared with third parties.
What should I do if my import fails?
If your import fails, check your file format, internet connection, and file size. Try splitting large files into smaller batches or re-exporting from your source platform.
Leave a Reply